A RAMS map looks at land suitability and takes into account pollution risks when spreading slurry and manure. It highlights “no-spread zones” and spreading risks, providing a clear guide for contractors and farmers spreading manure and slurry. Using a RAMS map shows good farming practice and can be used as part of both your Farm Slurry and Manure Management Plan (FSMMP).
How to draw up a RAMS for your farm
You will need:
- A photocopy of a map of the farm showing ditches and fences (1:10 000 or larger). A copy of your IACS map would be ideal.
- Coloured pens/pencils (red, orange, yellow, blue and green).
- A calculator.
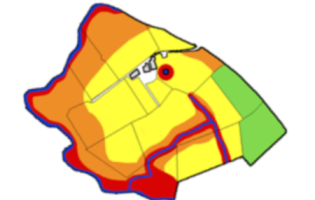
An example of a completed map shown in the image.
Step 1 –
Draw on the map in blue all ditches, burns, rivers, lochs and any ponds or wet areas on your farm (especially marsh/bog areas and areas that are prone to flooding).
Step 2 –
Consider any field areas which should be classed as no-spread zones. Mark these on the map in red. These include:
- Within 50m of a spring, uncapped well or borehole.
- 10m of any ditch, burn, river, loch or wetland.
- Steeply sloping land, with slopes in excess of an 11o gradient (1 in 5 )3 (unless a sufficient buffer zone is in place to protect the watercourse).
- Shallow soils with an average soil depth of less than 40cm and overlies gravel or fissured rock.
- Any areas with separate management agreements such as SSSI and agri-environment schemes.
- Unimproved land that has not previously received slurry or manure, e.g. land used for rough grazing.
- Wooded land, steading areas, farm roads and yards (alternatively these can be left white, as would be obviously unsuitable for spreading).
3 Site dependent. Can spread on land up to 15o (1 in 3) if all other factors are of acceptable risk with no risk to local water quality.
Remember to consider wells, boreholes and springs on neighbouring land and adjust your no-spread zone accordingly. Gradients also play a factor, as risk of runoff increases with slope. No-spread zones may need to be extended uphill of a water supply.
Step 3 –
The remaining land can be further split into high, moderate and low risk areas. Within one field it is possible to have a number of risk categories, depending on individual circumstances. Assess potential spreading risks with reference to the following three land categories and mark these areas on your map:
High risk areas – orange
Spreading in these areas presents a potentially high risk that pollution will occur as a direct result of spreading. Colour the following areas on your map in orange:
- Slopes with a gradient of between 8 and 110 (approximately 1 in 7 to 1 in 5).
- Areas with a risk of flooding more often than one in five years.
- Fields with drainage installed in previous 12 months.
- Poorly drained, waterlogged or severely compacted land.
Moderate risk areas – yellow
Care will still have to be taken in areas categorised as moderate risk. Ground conditions should be checked before spreading. Colour the following areas on your map in yellow:
- Slopes with a gradient of between 4 and 70 (approximately 1 in 14 to 1 in 8).
- Land sloping towards watercourses or water supplies.
- Imperfectly drained or saturated land.
Low risk areas – green
The remaining land presents a lower pollution risk and can be used throughout. Colour code the following areas on your map in green:
- Slopes with a gradient up to 30 (approximately up 1 in 19).
- Land with no artificial drainage.
Don’t spread if –
- The soil is frozen (unless you are applying farmyard manure).
- Covered in snow.
- Land is compacted or waterlogged.
- Heavy rainfall is forecast.
- Application would exceed recommended guidelines (see Table 10).
- Slurry or manure was previously applied to that field in the last 3 weeks.
All fields should now be colour coded on the basis of potential spreading risk. Note that other factors could change the spreading risk (e.g. heavy rainfall forecast) and will still have to be taken into account.
How much can I apply?
Applications should be matched to a nutrient management plan, targeting the areas of the farm that need the nutrients at the right time for the growing crop. Maximum and normal application rates of slurry and manure are shown in Table 10.
Make sure you use a competent and appropriately trained contractor who is aware of the pollution risk associated with spreading on your land.
Table 10. Maximum and normal surface application rates in optimum conditions. (Adapted from PEPFAA Code).
| Material | Maximum application rate | Normal application rate |
| Slurry | 50 m3/ha | 20-30 m3/ha |
| Manure | 50 tonnes/ha | 30-50 tonnes/ha |
| Poultry manure | 5-15 tonnes/ha | 5-15 tonnes/ha |
| Contaminated water | 50 m3/ha | 25-30 m3/ha |
Mind the gap – minimum distances when working near watercourses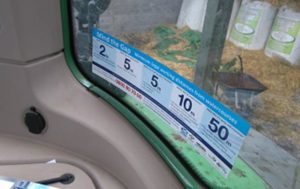
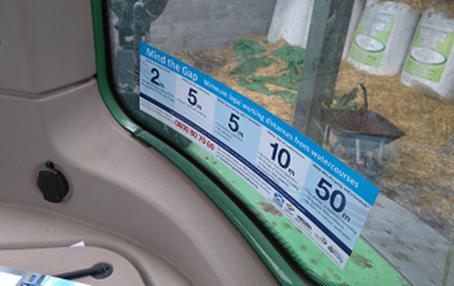
Under the Diffuse Pollution General Binding Rules (DP GBRs), minimum distances apply when spreading slurry and manure next to watercourses. No spread zones for slurry and manure are:
- within 10m of a watercourse.
- within 50m of an uncapped spring, well or borehole4.
Pick up your free ‘Mind the Gap’ tractor sticker from SAC Consulting or via Farming and Water Scotland.
4 Refers to any spring that supplies water for human consumption or any well or borehole that is not capped to prevent water ingress
![]() Download a pdf version of How to Complete a Risk Assessment for Manure and Slurry (RAMS) Map
Download a pdf version of How to Complete a Risk Assessment for Manure and Slurry (RAMS) Map